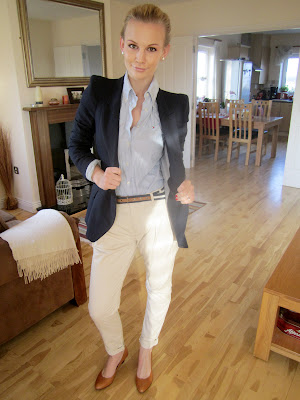
I received a couple of requests to do a post on how I edit my blog pictures. I really don't do a whole lot but I feel like it's the smaller "tweaks" that make a picture look better. You definitely don't want to go overboard, otherwise the pictures won't look natural. Above is a picture from Wednesday's set that you haven't seen yet. On the left is the "before" shot and on the right is the "after". You can see how the colours are popping in the after shot, it's brighter, more vibrant and if you click on it close-up you will see that it actually gives the illusion of a flawless complexion. (Hehehe... ;) Whereas the before shot is a little bit duller and the colours don't show up as well. Here's exactly how I achieve this using Photoshop CS3.
(Click on any image to make it bigger!)
Step 1 - Curves
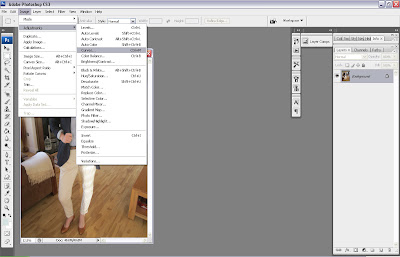
Adjusting the curves is what will brighten up the picture. To open them up go to Image, then Adjustments and select Curves.
This will open up a little box with a graph on it. These are the curves of the photo. You can move the line to adjust the lighting of the picture.
You can see from this picture exactly how far and in what direction I moved the curves line. I usually move it up and to the right a little bit, to achieve a brighter and lighter effect.
Step 2 - Levels
The levels are what I use to intensify the colours a little bit. To open them up, hit Image, Adjustments and then select Levels.
This will open up another box which shows you the levels of the picture. This is similar to curves in that you can move the little arrows up and down the graph to adjust the colours and lighting of the picture.
Here you can see that I moved the left arrow up from zero to twenty-eight. As soon as you move the left arrow up the scale you will see the colours in your picture intensify. The farther up you go the darker the picture will become so you don't want it too dark. Just until the colours "pop".
Step 3 - Save for Web
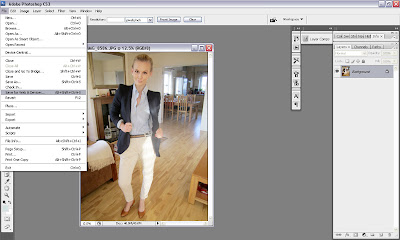
It's important that you save the image for web. This ensures the best quality for viewing online (like on a blog!). Depending on the camera you've used, you will probably have to make the image smaller as well. This is very easy to do, you just hit Ctrl+Alt+I and change the image to whatever size you need. I usually make mine about 1200 pixels in width. To save for web, simply go to File and then select Save for Web!
This will bring up a large window like this where you can see more clearly the effect the adjustments you've made have had on the quality of your picture. You can see here that it is brighter and my skin looks clearer. Also the colours are more vibrant! If you're happy with your work, just hit Save.
And that's it! Above are the before and after shots in full so you can see the difference between them. I love using this method because I feel it improves the quality of my overall blog as good pictures are really what count! I don't recommend airbrushing or touching up blog pictures, because I think this makes them look really fake and unrealistic!
Hopefully this will help you if you're a blogger also or even if you just want to print some of your favourite pictures and would like them to look their best! I will be making a full video tutorial with my fiancé on how to take the optimal pictures for your blog which will cover lighting, camera quality, posing, angles, backdrop and editing/post production as well. This is what Jonathan is trained in professionally (not me!) so he has a lot of knowledge to share! The video will be up next week, but in the meantime you have any other questions on this subject just leave me a comment or ask me on Formspring and I'll be happy to help you out! :)
Stay Stylish!
xoxo


Well done Anna. Thanks for the tutorial on how you achieved the look in PhotoShop. Cheers
ReplyDeleteThank u Anna. I love your blog and I'm your new follower. Valeria from Milan
ReplyDeletehttp://www.luggageandhighheels.blogspot.com/
I need help to edit my pictures.I would like to know how I can erase some flaws(dark circles, hair...stuff like this)and improve some areas on my face (brighten up my skin, give it a glow),stuff related to beauty.Could Jonathan give me some advise?
ReplyDeleteThank you!
Kisses!
Photoshop is one of my best friends and definitely a must when you do design things and deal with pictures...great step by step tutorial, Anna! I hope you, Jonathan and the doggies have a lovely weekend!!!
ReplyDeleteLiesl :)
Some blog/videos and resources on this topic that may help you with the tutorial:
ReplyDeletePhotography for the Amateur, Stagefright-Afflicted Blogger
http://www.gritandglamour.com/2010/06/22/photography-for-the-amateur-stagefright-afflicted-blogger/
Five Tips For Taking Better Photos of Yourself
http://heartifb.com/2011/01/14/five-tips-for-taking-better-photos-of-yourself/
woow many thanks anna!! I really needed those tips :) xoxo
ReplyDeleteForget the editing.....I can't get over how chic the whole look is. The hair blazer and chinos......love. Xx Alex
ReplyDeleteill look forward to the video! xx
ReplyDeleteanna--- thanks for visiting my blog and leaving me that sweet comment :) also---I love this post! I actually use the brightness/contrast tool to edit my photos in photoshop, but I will try the way you do it instead.
ReplyDeleteThis comment has been removed by the author.
ReplyDelete